Showing posts with label Education. Show all posts

Analyzing Three Forces to Determine the Net Force

Methods of adding vectors were discussed earlier in Lesson 1 of this unit. During that discussion, the head to tail method of vector addition was introduced as a useful method of adding vectors that are not at right angles to each other. Now we will see how that method applies to situations involving the addition of force vectors.
A force board (or force table) is a common physics lab apparatus that has three (or more) chains or cables attached to a center ring. The chains or cables exert forces upon the center ring in three different directions. Typically the experimenter adjusts the direction of the three forces, makes measurements of the amount of force in each direction, and determines the vector sum of three forces. Forces perpendicular to the plane of the force board are typically ignored in the analysis.
Suppose that a force board or a force table is used such that there are three forces acting upon an object. (The object is the ring in the center of the force board or force table.) In this situation, two of the forces are acting in two-dimensions. A top view of these three forces could be represented by the following diagram.

The goal of a force analysis is to determine the net force and the corresponding acceleration. The net forceis the vector sum of all the forces. That is, the net force is the resultant of all the forces; it is the result of adding all the forces together as vectors. For the situation of the three forces on the force board, the net force is the sum of force vectors A + B + C.

One method of determining the vector sum of these three forces (i.e., the net force") is to employ the method of head-to-tail addition. In this method, an accurately drawn scaled diagram is used and each individual vector is drawn to scale. Where the head of one vector ends, the tail of the next vector begins. Once all vectors are added, the resultant (i.e., the vector sum) can be determined by drawing a vector from the tail of the first vector to the head of the last vector. This procedure is shown below. The three vectors are added using the head-to-tail method. Incidentally, the vector sum of the three vectors is 0 Newton - the three vectors add up to 0 Newton. The last vector ends where the first vector began such that there is no resultant vector.
The purpose of adding force vectors is to determine the net force acting upon an object. In the above case, the net force (vector sum of all the forces) is 0 Newton. This would be expected for the situation since the object (the ring in the center of the force table) is at rest and staying at rest. We would say that the object is at equilibrium. Any object upon which all the forces are balanced (Fnet = 0 N) is said to be at equilibrium.
Quite obviously, the net force is not always 0 Newton. In fact, whenever objects are accelerating, the forces will not balance and the net force will be nonzero. This is consistent with Newton's first law of motion. For example consider the situation described below.


An Example to Test Your Understanding

A pack of five Artic wolves are exerting five different forces upon the carcass of a 500-kg dead polar bear. A top view showing the magnitude and direction of each of the five individual forces is shown in the diagram at the right. The counterclockwise convention is used to indicate the direction of each force vector. Remember that this is a top view of the situation and as such does not depict the gravitational and normal forces (since they would be perpendicular to the plane of your computer monitor); it can be assumed that the gravitational and normal forces balance each other. Use a scaled vector diagram to determine the net force acting upon the polar bear. Then compute the acceleration of the polar bear (both magnitude and direction). When finished, check your answer by clicking the button and then view the solution to the problem by analyzing the diagrams shown below.
  
  
The task of determining the vector sum of all the forces for the polar bear problem involves constructing an accurately drawn scaled vector diagram in which all five forces are added head-to-tail. The following five forces must be added.
The scaled vector diagram for this problem would look like the following:


The above two problems (the force table problem and the polar bear problem) illustrate the use of the head-to-tail method for determining the vector sum of all the forces. The resultants in each of the above diagrams represent the net force acting upon the object. This net force is related to the acceleration of the object. Thus, to put the contents of this page in perspective with other material studied in this course, vector addition methods can be utilized to determine the sum of all the forces acting upon an object and subsequently the acceleration of that object. And the acceleration of an object can be combined with kinematic equations to determine motion information (i.e., the final velocity, the distance traveled, etc.) for a given object.

Sometimes 10 + 10 = 10 

In addition to knowing graphical methods of adding the forces acting upon an object, it is also important to have a conceptual grasp of the principles of adding forces. Let's begin by considering the addition of two forces, both having a magnitude of 10 Newton. Suppose the question is posed:
10 Newton + 10 Newton = ???
How would you answer such a question? Would you quickly conclude 20 Newton, thinking that two force vectors can be added like any two numerical quantities? Would you pause for a moment and think that the quantities to be added are vectors (force vectors) and the addition of vectors follow a different set of rules than the addition of scalars? Would you pause for a moment, pondering the possible ways of adding 10 Newton and 10 Newton and conclude, "it depends upon their direction?" In fact, 10 Newton + 10 Newton could give almost any resultant, provided that it has a magnitude between 0 Newton and 20 Newton. Study the diagram below in which 10 Newton and 10 Newton are added to give a variety of answers; each answer is dependent upon the direction of the two vectors that are to be added. For this example, the minimum magnitude for the resultant is 0 Newton (occurring when 10 N and 10 N are in the opposite direction); and the maximum magnitude for the resultant is 20 N (occurring when 10 N and 10 N are in the same direction).


The above diagram shows what is occasionally a difficult concept to believe. Many students find it difficult to see how 10 N + 10 N could ever be equal to 10 N. For reasons to be discussed in the next section of this lesson, 10 N + 10 N would equal 10 N whenever the two forces to be added are at 30 degrees to the horizontal. For now, it ought to be sufficient to merely show a simple vector addition diagram for the addition of the two forces (see diagram below).


We Would Like to Suggest ...

Sometimes it isn't enough to just read about it. You have to interact with it! And that's exactly what you do when you use one of The Physics Classroom's Interactives. We would like to suggest that you combine the reading of this page with the use of our Name That Vector Interactive, our Vector Addition Interactive, or our Vector Guessing Game Interactive. All three Interactives can be found in the Physics Interactive section of our website and provide an interactive experience with the skill of adding vectors.


Check Your Understanding

Answer the following questions and then view the answers by clicking on the button.
1. Barb Dwyer recently submitted her vector addition homework assignment. As seen below, Barb added two vectors and drew the resultant. However, Barb Dwyer failed to label the resultant on the diagram. For each case, that is the resultant (A, B, or C)? Explain.


2. Consider the following five force vectors.
Sketch the following and draw the resultant (R). Do not draw a scaled vector diagram; merely make a sketch. Label each vector. Clearly label the resultant (R).
A + C + D

B + E + D

Introduction to Graphic Organizers

Introduction to Graphic Organizers
Graphic organizers guide learners’ thinking as they fill in and build upon a visual map or diagram. Graphic organizers are some of the most effective visual learning strategies for students and are applied across the curriculum to enhance learning and understanding of subject matter content. In a variety of formats dependent upon the task, graphic organizers facilitate students’ learning by helping them identify areas of focus within a broad topic, such as a novel or article. Because they help the learner make connections and structure thinking, students often turn to graphic organizers for writing projects.

In addition to helping students organize their thinking and writing process, graphic organizers can act as instructional tools. Teachers can use graphic organizers to illustrate a student’s knowledge about a topic or section of text showing areas for improvement. For more graphic organizer examples including, webs, concept maps and mind maps

Definition of a Graphic Organizer:

A graphic organizer is a visual display that demonstrates relationships between facts, concepts or ideas. A graphic organizer guides the learner’s thinking as they fill in and build upon a visual map or diagram. They are also informally used as a term to describe all visual learning strategies such as concept mapping, webbing, mind mapping, and more.


Types of Graphic Organizers:

Webs, concept maps, mind maps and plots such as stack plots and Venn diagrams are some of the types of graphic organizers used in visual learning to enhance thinking skills and improve academic performance on written papers, tests and homework assignments.

Concept Maps:
Concept maps graphically illustrate relationships between two or more concepts and are linked by words that describe their relationship.


Webs:

Brainstorming webs show how different categories of information relate to one another.

Mind Maps:

Mind Maps are visual representations of hierarchical information that include a central idea or image surrounded by connected branches of associated topics or ideas. 

How to use graphic organizers:

Graphic organizers are tools that can be used to visualize and organize information. Because graphic organizers are often used as prompts for students to fill in the blanks, graphic organizers provide many benefits to students who use them including:
·         Helping students structure writing project
·         Encouraging students to make decisions
·         Making it easy for students to classify ideas and communicate
·         Allowing students to examine relationships
·         Guiding students in demonstrating their thinking process
·         Helping students increase reading comprehension
·         Making it easy to brainstorm
·         Encouraging students to organize essential concepts and ideas
·         Making it clear how to break apart a story into the main elements (intro, rising action, climax, etc.)

Teaching with Graphic Organizers

Used across the curriculum, teachers use graphic organizers to teach many things, including but not limited to:
·         Cause and effect
·         Note taking
·         Comparing and contrasting concepts
·         Organizing problems and solutions
·         Relating information to main themes and ideas
·         Organizational skills
·         Vocabulary knowledge
·         Sequencing


Using Inspiration Software’s visual thinking and learning products Inspiration®, Kidspiraton® and Webs piration Classroom™, students and teachers create graphic organizers as they brainstorm ideas, organize information, gather research, make visual associations and identify connections.
For more graphic organizer examples including webs, concept maps and mind maps

 Here are some other examples:


***************************************************


******************************************************


****************************************************

*****************************************************

*****************************************************


********************************************************


Here are some of my examples:


^^^^^^^^^^^^^^^^^^^^^^^^^^^^^^^^^^^^^^^^^^^^^^^^^^^^^^^^^^^^^^^^^^^^^^^^^^^^^^^^^^^^^^
                                             The Front Part of The Organizer


&&&&&&&&&&&

The back Part of The Organizer


Thank you  For  Visiting 
END


Sivar Aziz                                                                                            (Hawler)8-6-2015


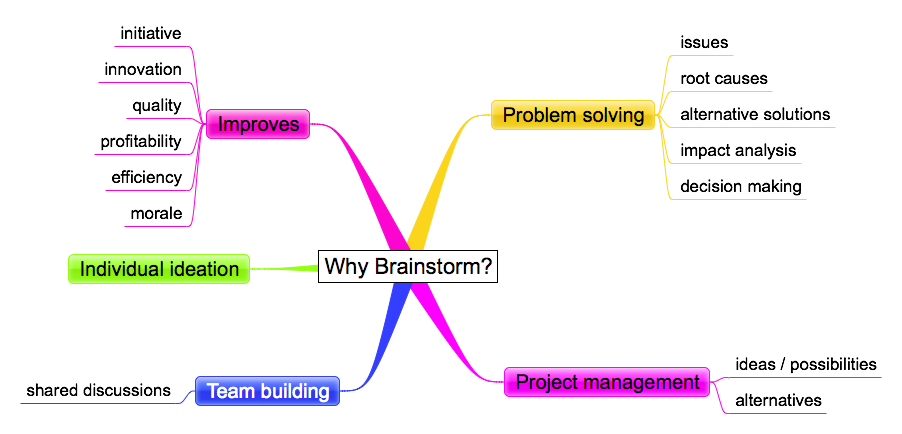
Benfits of Brainstorm


Picture explains:


sivaraziz0@gmail.com

Contact us and send your new ideas about the subject.

All WH Questions Answer of Brainstorm{sumstorm}

The Real Meaning of Brainstorming and How to Do It


A popular myth is that the meaning of Brainstorming is somehow related to generating a storm of ideas in a brain. While making sense, the creator had something slightly different in mind when he came up with the term: The word Brainstorming was coined by Alex Faickney Osborn (1888-1966) in his book “Your Creative Power”, published in 1948. Osborn was a very successful advertising executive and business owner during his time.
This is how Osborn explains how the name “Brainstorming” came about:
“It was in 1939 when I first organized such group-thinking in our company. The early participants dubbed our efforts “Brainstorm Sessions”; and quite aptly so because, in this case, 
“brainstorm” means using the brain to storm a creative problem and do so in commando fashion, with each stormer attacking the same objective.

What is Brainstorming then?


Following Osborn’s definition, consider a problem a fortress we try to storm with a group of brains (our army):


Classical Brainstorming is a group technique to create new ideas. The group takes aspecific problem and creates as many ideas as possible in a limited time. In a Brainstorming session, we want every group member to speak out all ideas that come to his/her mind, no criticism is allowed, and the wilder an idea the better. Members are encouraged to use other members’ ideas as trigger (input) to create/associate further ideas, and to combine ideas.

Why and when use brainstorming?

We can use brainstorming to solve all kinds of problems (business, public administration, military, family, personal). It is important to have a problem that is specific and can be made into a question.
What do we need?
§  A specific problem/challenge expressed as a question.
§  A group of between 5 and 10 people. We want a mixed group of men and women, experts and non-experts. The group can contain the president, managers, workers, cleaners…. Everyone might have ideas that can help to solve the problem.
§  A leader who ensures that a few basic rules are followed.

How to Brainstorm?

1.      The leader or another member introduces the problem. The problem is expressed as a question (this can be done before the meeting, or as first step in the meeting)
2.      The problem is explained in a way that all group members understand the problem.
3.      Some facts / details of the problem are provided before we start brainstorming. A field trip or visit to the place where the problem occurs can help the group members to see and understand the nature of the problem.
4.      The group meets in a half circle and starts to storm the problem. Everyone just speaks out his/her ideas. All ideas are welcome, simple ideas, crazy ideas…. We want as many ideas as possible. The more ideas, the better. No group member, including the leader is allowed to criticize any idea. Everyone is encouraged, to use other group members’ ideas to come up with yet another idea.
5.      All ideas are recorded by a note taker (can be the leader or another person) at a place where all group members can see the ideas. The easiest way is to record the ideas in form of a list on a flip chart or white board. We don’t note ideas word for word but try to use keywords or short phrases.

Four Basic Rules (as described by Osborn)

1.      No criticism is allowed during brainstorming. (Evaluation of ideas after the brainstorming)
2.      Quantity is important. The more ideas the better. (Don’t worry about speaking out only “good” ideas.)
3.      Wildness is good. Crazy ideas are welcome. (Many times the craziest ideas turn out to be the best ones)
4.      Combining other ideas and taking another person’s ideas a step further or using them for yet another idea is good.
A brainstorming session lasts between 30 minutes and 1 hour. After the meeting, the list of ideas is copied and distribute to all group members. A good way to copy a whiteboard or flip chart is to take a picture with a digital camera.

Evaluation of Ideas

Ideas can be evaluated in a second meeting. Here is an easy way to evaluate ideas:
Each attendant gets a packet of 5 dots and has to place the dots on the ideas he/she likes the most. You can place all dots on one idea, or on 5 different ideas, or on any other combination. If you don’t have dots, you can also use a red marker to draw a dot.

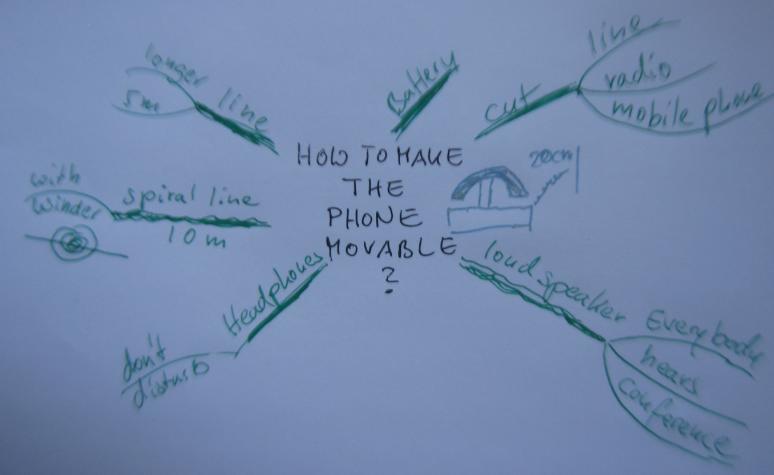
Another way to record ideas during the meeting could be in form of a mind map:

§  On a whiteboard
§  On a computer where the mind map is projected to a screen where all group members can see the mind map:
§  Different colors can be used.
§  We don’t note ideas word for word but try to use keywords or short phrases.
Mind maps arrange the ideas in form of a circle. The ideas are branches that radiate from a center that contains the problem or challenge.  Ideas that are associations of other ideas can be sub branches that originate from the main branches.
Mind mapping takes a bit of experience, but is good fun and makes it easier for people to associate (find ideas based on other members’ ideas)
The disadvantage of mind mapping is that we might run out of space on our whiteboard. Mind Mapping on a computer can solve this problem and make it easier to later rearrange ideas.

Brainstorming Example

Problem Description: When I was a child, our home phone used to be in the hallway. The phone was connected via a 30 cm fixed line. Every time the phone rang, or you wanted to make a phone call, you had to go to the hallway and pick up the phone. In the winter, the hallway was cold and there was only a hard wooden bench to sit. It was very difficult for more than one person to sit there, and uncomfortable for elderly people to always walk to the phone.
We wanted the phone to come to the people.
Problem as a question: How can we make the phone movable?

Brainstorming Session Mind Map:

Why is Brainstorming effective?

§  It is fun
§  It encourages creativity and discourages criticism during the idea finding phase. The evaluation of ideas is separated from the creation.
§  Ideas by one group member are used by other group members to come up with more ideas (associations). Osborn calls this “contagion” and “chain reaction”. Osborn claims that more associations are produced than if only one person brainstorms.

Solo Brainstorming: Can I brainstorm by myself?

While originally devised as a group technique, there is nothing that keeps you from giving solo brainstorming a go. Again, use a specific problem you want to solve. Find facts and additional information. Write the problem as a question. Then take about 20 to 30 minutes and write a list to come up with all ideas you can. Note down key words and short phrases. Don’t judge any idea that comes to mind. Just write. One idea will trigger another idea….. Again, you can also use a mind map for your brainstorming. Write the problem/challenge in the center of a blank paper. You can also draw a little picture in the center to symbolize the problem
In future posts, we will take a closer look at other idea creation techniques, and techniques to evaluate ideas.
my examples:
For students :


For teachers:
Contact us and send your new ideas about the subject.

Interactive NoteBook


Hi everyone,

I'm linking up with the fabulous Bright Ideas group today with some tips for Interactive Notebooks.

I started using interactive notebooks in my classroom last year and I absolutely LOVED it. However, I wish I could have had a few tips before getting started! I would have avoided a few wrong turns along the way. That being said, I will share with you my top 10 tips for implementing notebooks in your classroom. If you haven't given interactive notebooks a try yet, or if you would like to perfect your use of interactive notebooks, this post is for you!

What are Interactive Notebooks?

Interactive Notebooks (INB) are your students’ “go to” resource, where they can refer back to any concepts that have been taught in class. It’s a more interactive way to take notes!

As the year goes on, students add pages to their notebook and refer back to them when studying or when they need to review a concept and/or skill. They are basically building their own textbook as the year progresses.

INB are a great tool for teachers too!
They help us reflect on both our students’ learning styles and our own teaching and planning. They are a great way to analyze our students’ understanding of new concepts. In turn, we can use the knowledge that we gain from the INB to create, plan, and manage our small group instruction. We can also use this information to make accommodations and modifications for all students, not only those on individual learning plans. Observation during the INB process is a great time to take notes on students’ learning, questions that may arise, and skills that they may be struggling with. This helps with further planning and teaching.


How Much Time Does It Take?

That really depends on you, your class, and how much time you are willing to put into this. Start small and go from there. The more you students get familiar with using their notebooks, the easier it will get and the faster they will be with the cutting and gluing. If you spend lots of time teaching them the rules and procedures at the beginning of the year, the better they will be at it down the line.

What Do I Need To Get Started?
All you need is a simple copy book for each student! There are plenty of interactive notebooks available online. Just do a quick search on the web, or on Teachers Pay Teachers, and you are sure to find what you need!

My Top 10 Tips for Interactive Notebook
Save the first couple of page
at the front of each notebook.
As the year progresses and your students add pages to their notebook,they can add titles in the table of contents. This will help them find page more easily
when the book starts getting pretty full!

Each time your students add a page to their notebooks, have them write the page number in the bottom corner. They will be able to write page numbers next to each title in their table of contents, which will be helpful when they are looking for a particular page.

Make easy bookmarks by sticking a piece of yarn or string to the back of the notebook. Students can use this bookmark to avoid looking for pages when they are starting a new project, or when they are reading their notebook.

When your students are working on a new project, always display a model for your students to refer to. This will avoid many questions and will give you more time to concentrate on helping kids with the skill or concept, rather than the layout of the page.
When it comes to glue, it really up to you!
Some teacher prefer roll on glue because it isn't as messy as white glue.
It may not be as sticky and you may have pieces that fall out in the long run...
 The best solution I have found is sponge glue. You can find a tutorial on how to make these over at
The Kindergarten Smorgasboard.
Mr. Greg will show you how it's done ;)
Encourage your students to keep all their scrap papers
at their desk until they are finished
with their notebook page.
This will help you avoid "trash tears" and disappearing papers!
I have found that my students often struggle
with keeping their writing behind the flaps,
especially if the pieces are a little small.
In order to help them fix this problem,I show them how to trace a line around the flap.
This way, they create a border for their writingand can easily fit their writing inside the lines.It makes for a better looking page ;) Keep a pocket at the front of every student’s notebook. 
If they are not finished with an activity, they will have a place to store their extra pieces!If you don't want to use your class time for the coloring, no problem! Just send it home. It's nice for our students to have a nicely colored and decorate page, but that is not the point of interactive notebooks. The most important thing is that your students are learning and creating a book that they will use as a reference.
Personally, I like to let my students color their page because they become proud of their notebooks when they have worked hard to make it their own. However, if we run out of class time, I either send home the coloring or allow them to grab their notebooks during their free time (ex: early finishers).
Lastly, make sure your students are proud of their work!
That's what is most important!If your students create something that they are proud of, they will be more likely to use it as their "go to" resource!
I hope you like my top 10 tips for interactive notebooks! 
If you haven't tried notebooks in your class yet, I highly recommend it. My students really got a lot out of them last year and I really look forward to using them with my new grade one class this year!